Prescription
In MedApp, managing prescriptions is a pivotal aspect of providing comprehensive patient care. This guide will walk you through the process of accessing the prescription screen, understanding its functionalities, and making the most of its features.
Accessing the Prescription Screen: To begin managing prescriptions, follow these steps:
Login: Access your MedApp admin account using your credentials.
Navigate to the Front End: Proceed to the front end of the MedApp, which is essentially the domain name of the application.
Click “Prescription” Link: In the top menu, locate and click the “Prescription” link. This action will take you to the Prescription Management screen, where you can effectively manage prescriptions.
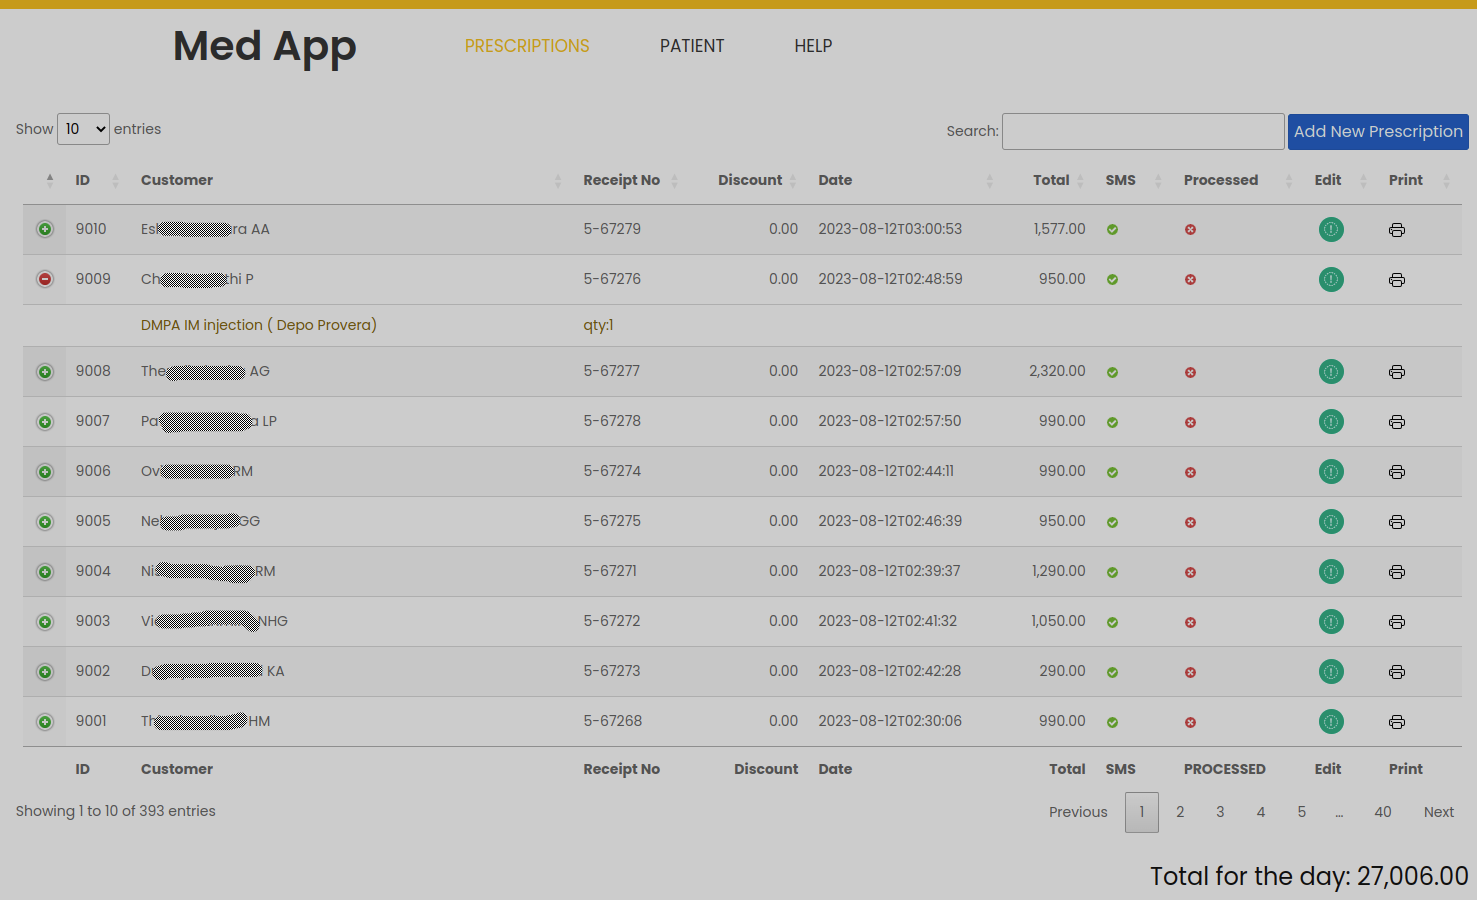
Viewing and Customizing Prescription Display:
Two Weeks Prescriptions: On the Prescription Management screen, you’ll find a comprehensive list of prescriptions spanning two weeks, along with various options.
Display Records per Page: By default, the screen displays 10 records per page. However, you can customize this by selecting a different number in the top left-hand corner to suit your preference.
Search Functionality: The search box primarily searches patient and prescription-related attributes such as patient name, receipt number, date, and total.
Interactive Features:
Expand Prescription Details: The prescription list screen offers a convenient feature that allows you to view the contents of a prescription. Simply click the “+” button in the left-hand corner of each row to expand and reveal more information.
Print Prescriptions: If you need a physical copy of a prescription, press the print icon located in the right-hand corner of each row. This functionality makes it easy to generate hard copies for your records or patient reference.
Enhanced Functionality:
Days Total Display: For added convenience, the bottom right-hand corner of the screen displays the total for each day’s prescriptions, helping you quickly assess daily activities.
Column Ordering: To easily organize the data, all columns can be sorted in ascending or descending order by clicking on the column name.
Add New Prescription
Click “Add New Prescription” Button: On the Prescription Management screen, locate and click the “Add New Prescription” button. This action will initiate the prescription creation process.
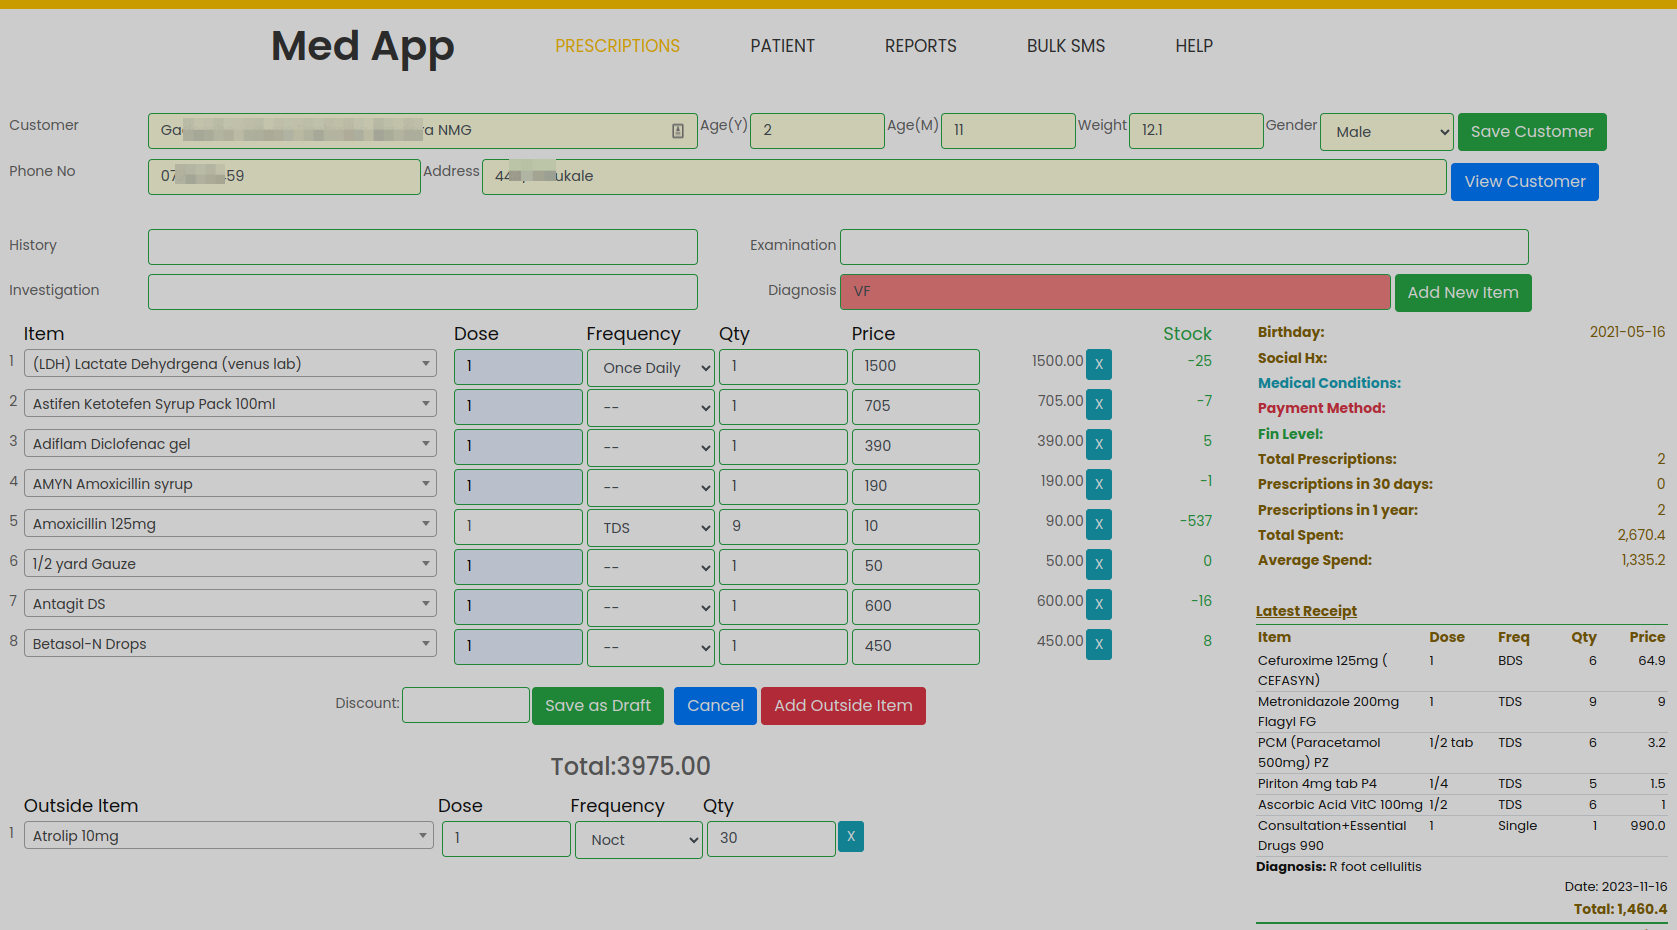
Adding Prescription Details:
Enter Patient Name: In the prescription creation screen, start by entering the patient’s name (also known as customer name). As you type the patient’s name, MedApp will automatically suggest existing patients based on your input.
Existing Patient: If the patient already exists in the system, select the patient’s name. MedApp will display their previous prescriptions, providing valuable insight into the patient’s medical history.
Update Existing Patient: If needed, update patient details like age, weight, and gender. Click the “Save/Update Customer” button to save these changes on the fly.
Adding New Patient: For new patients, enter the patient’s name, age, weight, and select the gender. After entering new customer details, press the “Save/Update Customer” button.
Utilizing Intelligent Suggestions:
Automatic Medicine Suggestions: By default, the system will load a few rows to add medicines. To add more rows, click the “Add New Item” button.
Medication Details: When selecting a medicine, MedApp will intelligently suggest dose, frequency, quantity, and price based on dosage values entered in the items screen. (If you want to add a new frequency not available in the drop down menu, please go to the admin and add a new record in the frequencies section).
Weight and Age Consideration: Doses are calculated according to the patient’s weight and age. It’s vital for doctors to review these suggestions meticulously before prescribing to ensure accurate dosing. Please note, the doctor is solely responsible for administering the correct dosage.
Stock Information: Another beneficial aspect is the display of available stock for each medicine. The system showcases the available stock within brackets at the end of the medicine name.
Allergy Management:
Allergy Prevention: A notable feature in the prescription creation screen is its ability to prevent the prescription of allergic medicines. If a medicine triggers allergies for the patient, the system will prevent its addition.
Accurate Prescription: This feature operates effectively when there’s an allergic item added against the patient. It ensures patient safety and accurate medication management.
Add Outside Medicines:
If the patient requires medicines not available in the medical center, you can add them manually. Click the “Add Outside Item” button to include these items. Once you saved the prescription, go to the prescription list section and you’ll see a red colur print icon to print the outside item.
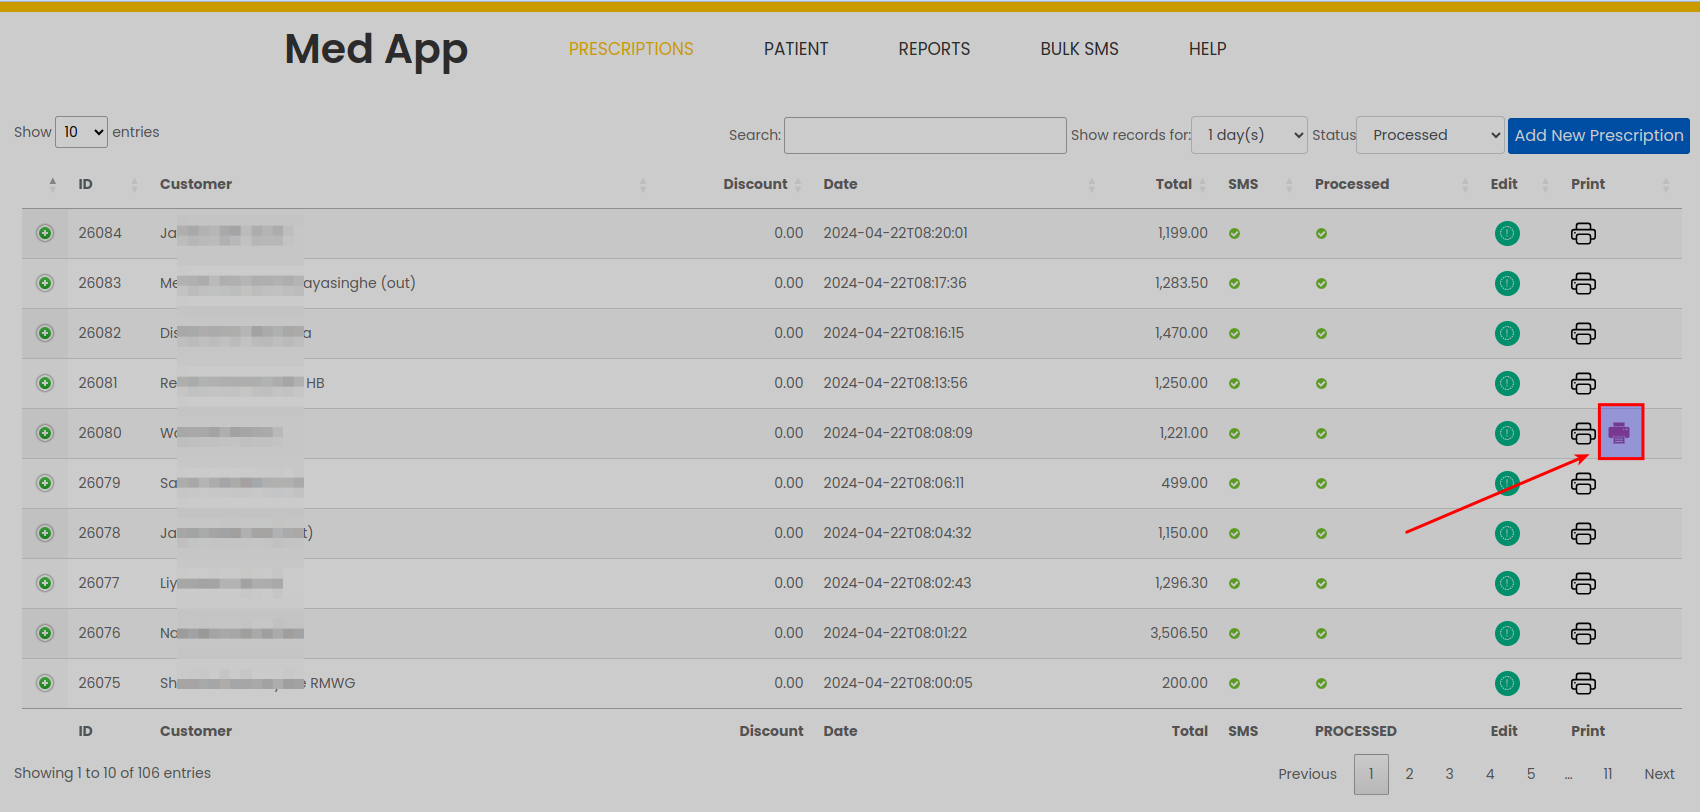
Saving the Prescription: Once all medicines are added to the prescription, click the “Save as Draft” button. This step saves the prescription for further review.
Edit & process Prescription
After creating prescriptions, the next vital step is to process invoices, ensuring accurate communication with patients and payment management. This guide will navigate you through processing prescriptions and managing invoices effectively.
Processing Invoices and Patient Communication:
To process invoices and facilitate patient communication, follow these essential steps:
Save Prescription as Draft: After creating a prescription, it’s crucial to save it as a draft. Until this process is complete, no invoice total will be sent to the patient.
Invoice Processing by Admin Staff: MedApp anticipates that this invoice processing step will be managed by the admin staff, distinct from the role of the doctor. The admin staff will handle patient interactions, payment collection, and invoice finalization.
Accessing Prescription List Screen: Begin by going to the Prescription List screen. Locate the prescription you wish to process and click the “Edit” button associated with that prescription.
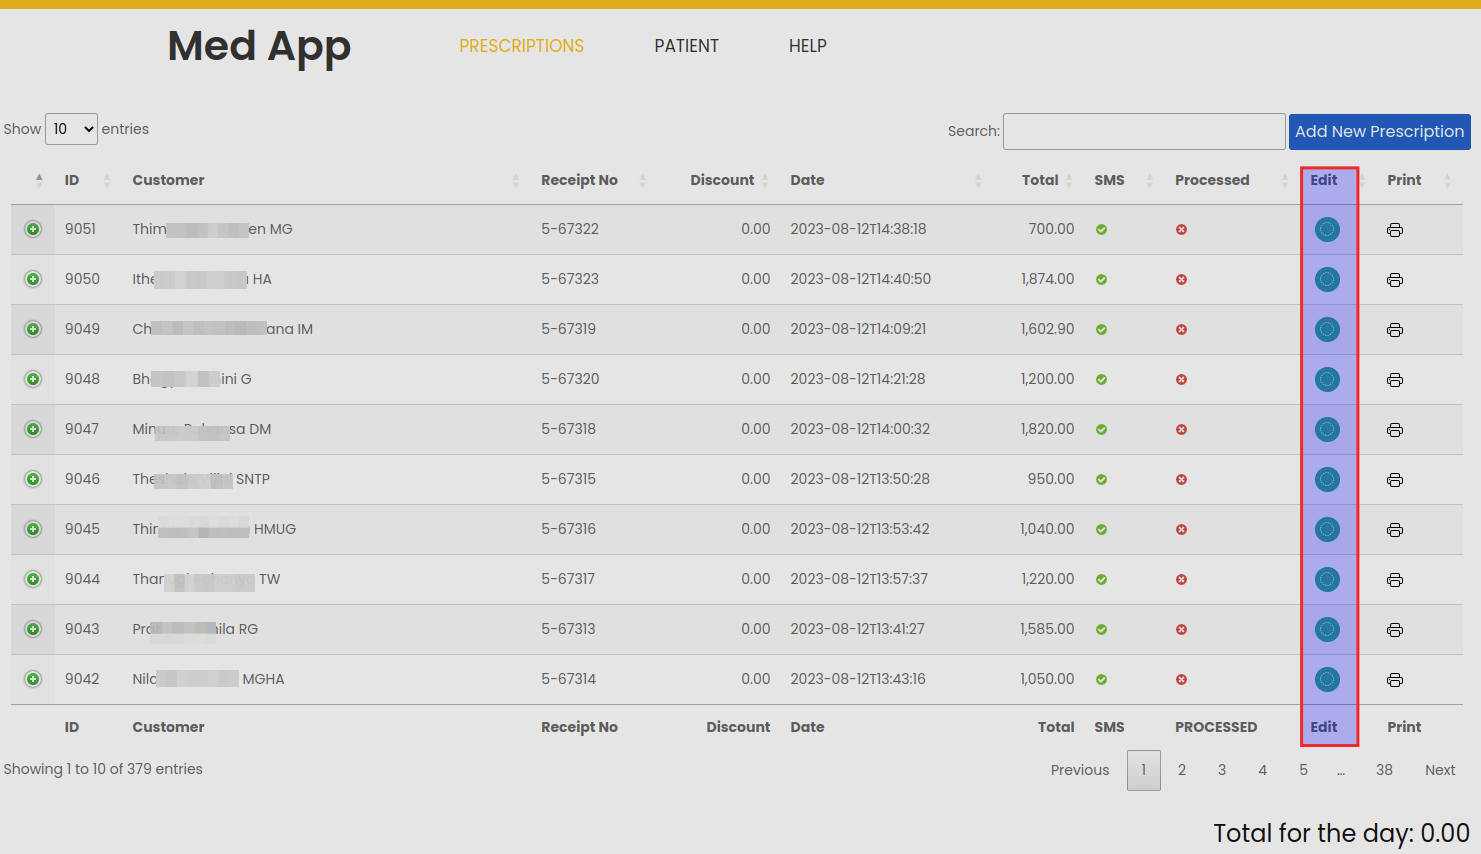
Redirected to Prescription Edit Screen: Clicking the “Edit” button will direct you to the Prescription Edit screen.
Processing Prescription and Communicating with Patients:
Completing Payment: Once all necessary patient communications are conducted and payments are received, you can proceed with processing the prescription.

Click the Process Button: On the Prescription Edit screen, look for the “Process” button. Clicking this button will initiate the invoice processing procedure.
SMS Notification: After clicking the process button, MedApp will automatically send an SMS notification to the patient. This feature ensures seamless communication and provides the patient with essential information.
Valid Phone Number Requirement:
Ensure a Valid Phone Number: Before triggering the prescription processing, ensure that the patient has a valid phone number associated with their profile. This is crucial for effective SMS communication.
Updating Phone Number: If the patient’s phone number is not valid or missing, go to the Patient Edit screen and add the correct and valid phone number.
Delete Prescription
To delete prescriptions in MedApp, follow these steps:
Admin Login: Log in to your MedApp admin account.
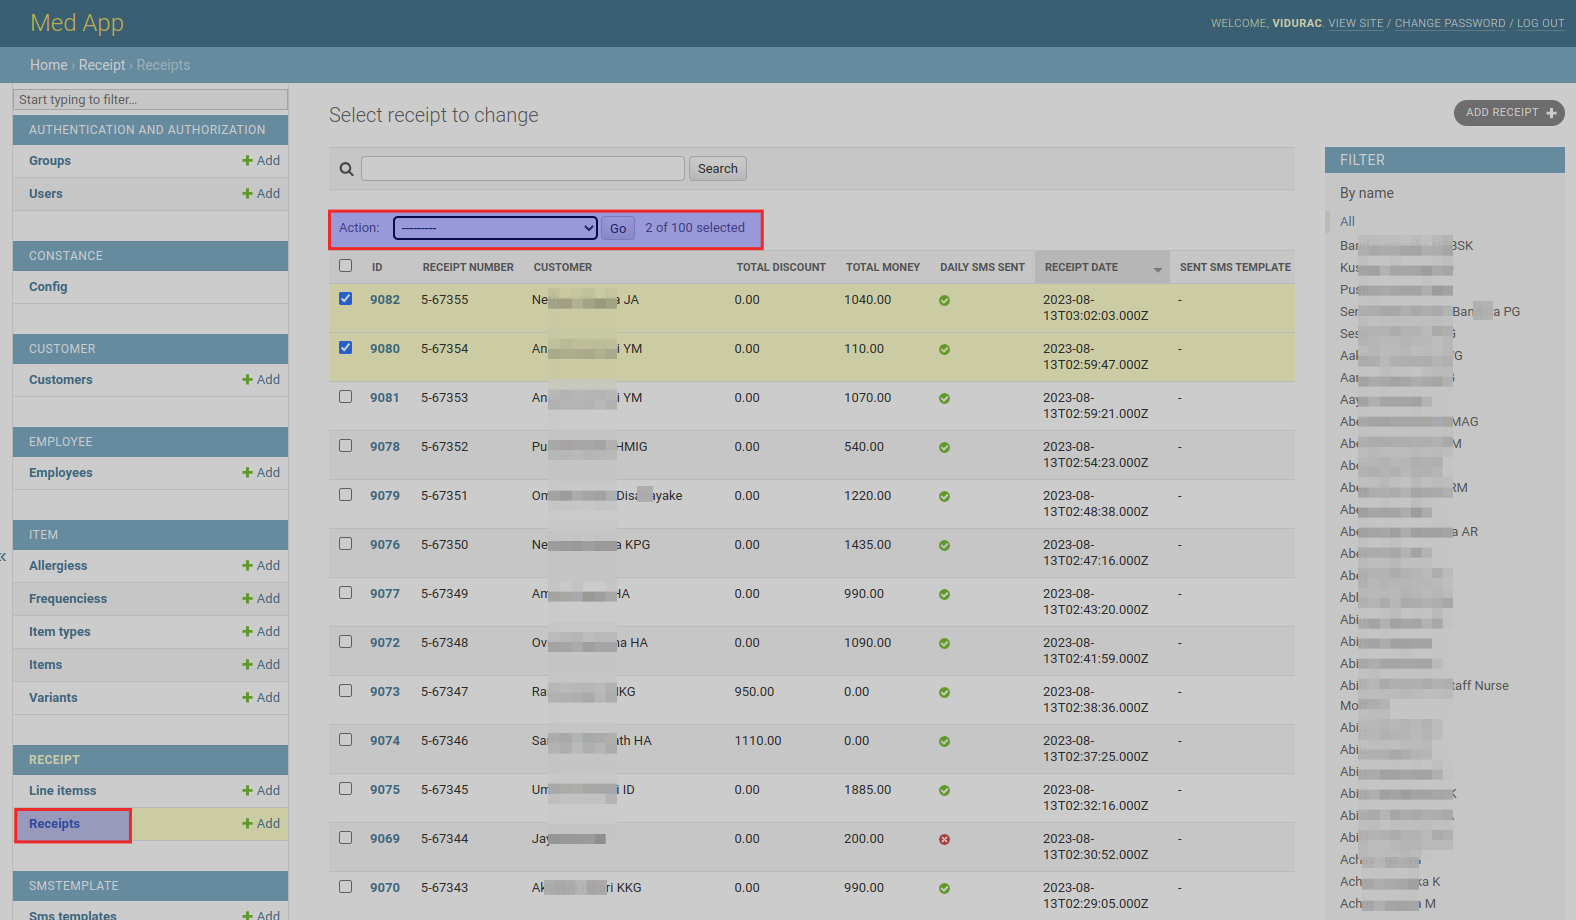
Navigate to Receipts: Once logged in, navigate to the admin section. Find and click on the “Receipts” section.
Select Receipt for Deletion: In the Receipts section, locate the receipt you want to delete. Tick the checkbox on the left hand corner to select it.
Choose Delete Action: After selecting the receipt, go to the “Action” section at the top of the list. Choose “Delete Selected Items” from the drop-down menu.
Execute Deletion: Once you’ve selected the “Delete Selected Items” option, click the “Go” button next to the menu. A confirmation prompt will appear, asking you to confirm the deletion.
Confirm Deletion: Confirm the deletion by clicking “Yes” or “Confirm” on the confirmation prompt.
Deletion Completed: The selected receipt will be deleted from the system.